

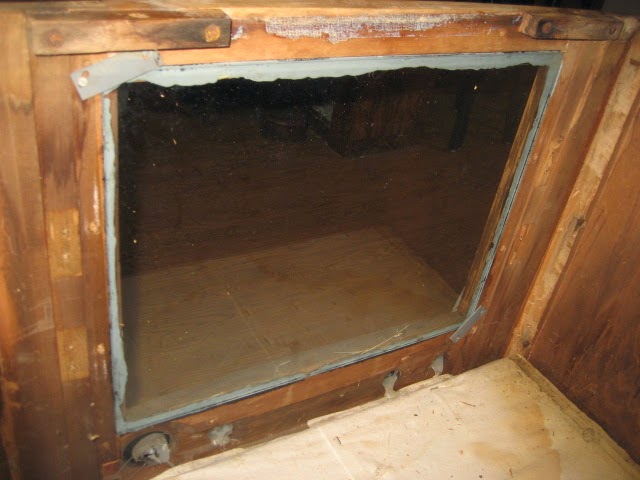
The curved TV screen had been replaced with a piece of plate glass that was embedded with a hard putty-like substance similar to the plastic used in football player's mouth guards. From the bedding material stuffed in the corners, and the chopped away insides, it was obvious someone had used it as an aquarium, not for an aquatic species, maybe geckos or sugar gliders. Or snakes.
Dan was intrigued and I offered to gut it and see if it was worthy of re-purposing it for a totally different use. It had some pitting, peeling and veneer issues, but great 'bones'. Little did I know when I started it that I would have to remake the entire cabinet. Usually, it is a matter of painting the "outside" of something and calling it good. On this piece, I had to build the entire "inside" with wood because now its underpinnings would be showing.

I ended up removing the top veneer which was ripped and peeling. Underneath, it had a lath type quality that would take a combination of stain and paint nicely.
After I abused my hands prying this glass out, I had to reinforce the top perimeter for re-setting the top, and back all the areas that were getting new planked beadboard. There are pieces of pine, cedar, oak, maple, ash-it's a virtual forest in there.

Dan wanted a shelf put in the lower section that formerly was just a grid with fabric that held speakers. And, he wanted it cut wider than the top. The tough part was that the front of the cabinet was rounded so any trim I added, I would have to score the back of and bend, or salvage from the cut-off pieces. Nightmareville. I literally dreamed of this piece every night.

I gingerly removed the mitered casing around the screen area (and it was intact) to strip and re-use. My carpenter abilities are greatly lacking, even with the new saw Peter and Andrew got me for Christmas. Seriously, that was the greatest present I would never buy myself. I use it a hundred times a day.

Still looking like "what was she thinking!" I added screen trim along the bottom to give it more character.

Yes, this is my dining room. Don't even think of calling Adult Protective Services on me, I have toooools, and I can fake using them! Every piece had to be glued, clamped and screwed. Because I had so few good clamps, I could only do one side at a time and then wait for it to cure. I ended up buying a bunch of cheap, plastic clamps from the big box, to speed up the process. Mistake, they ended up snapping and flying around the room. Right out of an I Love Lucy episode. Between drying time, I rolled in my computer chair from project to project, sanding, painting, glazing, drawing, napping, (who put that it in there?)

Some areas that were rotted out, I replaced the wood. In other areas, I used my go-to, Bondo (for cars). It dries quick and hard as a rock. The secret is to putty knife it as smooth as possible.

I was hoping to save the logo and the knobs, otherwise, it really wouldn't be worth it to resurrect this piece.

This is where all the tubes were. I cut filler wood for the large areas and Bondo'd the rest. Then cut ReStore luan to fit over top.

The planking beadboard panels are much easier to work with than the pre-painted sheet, and I just used what I had on hand, a bulk ReStore purchase when I didn't have a notion of what I would use them for. Score!

I don't ever remember turning a project over and over, so much, to work on every angle. Here is a view of the framing out the bottom cut-out. I scored the back of the trim with a jigsaw so that it would bend. Every time, I expected to hear, "SNAP".

Dan wanted it to be a green blue, and I wish I had made a whole gallon. I LOVE this color. I have hundreds of containers of paint. Seriously. It felt like cooking. Add some of this, some of that, more of this, a touch of....

This photo cannot accurately reflect the true color, which is exquisite. Later, I sanded, glazed and poly'd it. I knew that by adding the polyurethane, instead of waxing it, it would give it the yellowish hue he wanted, to appear more green. By now I had no ____ing energy. [supply your own verb]

This view shows that pallet wood flooring I used for the bottom shelf and how the edges look trimmed out.

Now, it's taking on some character. Sometimes, I get up in the middle of the night and go look at it. It reminds me of an antique Chevy truck. Awesome.

These old tools are just weighing down the edges of the top so I can judge whether there is too much or not enough color. I had to apply a color to the top as all the acetone in the world was not removing some industrial glue that held the old veneer on.
I felt as though I were 'wrastling' an alligator trying to get this top on. I need to invent something that vacuum packs a piece until the glue dries. Hold it here to clamp, it moves. Clamp there, and it snaps. Drill there and oops....


In order to expedite attaching the backing while waiting for the glue to cure, I cut the bead board planks and marked them first, so I could paint and distress beforehand. It's awfully hard reaching inside a narrow area to paint and sand. They are tongue and groove and a little pre-drilling keeps the nails from splitting the pine boards. I should be using a brad nailer, but the cable for it is hooked up to my heating system in the basement. [Don't ask.] All I had to purchase was a few pieces of trim wood and corner brackets to attach the top. One thing I discovered when I reinforced the top perimeter. I should have used wider wood. It was strong enough, but didn't give me placement for screws on the corner cleats. When I was contemplating the dilemma, I was turning over a small hinge in my hand. Eureka! Use hinges on all sides and it will connect and brace the pieces to each other and NOT OPEN. Genius.
The only cost for this project was some trim wood (about $15.00) and 4 sets of hinges ($10.00). All other supplies were on hand.
~.~.~.~.~
Soooooo...
My reclamation project went from a throw-away vintage RCA Victor television...

to a usable home for a vintner's spirits.

Cheers!
This posting was linked to Stephanie Lynn's Sunday Showcase Party No. 240.

and
Becky at Beyond the Picket Fence

and
Gail Wilson at My Repurposed Life

As always,
La Verne
hope&salvage
PS No grapes were harmed during the filming of this tutorial. The wine bottles were borrowed, and full glass was filled with red and blue food coloring, and water.
Wow, La Verne. What a creative piece! Goodness you are one patient woman.
ReplyDeleteI cannot believe how awesome it looks!! Is he sure he has to have it because I want it!!! That was a lot of blood, sweat, tears, and glue that went into that wine cabinet. You were right about keeping the RCA Victor on it. To the Victor go the spoils!!
ReplyDeleteAlready on to the next projects. Not quite as adventurous, but as worthy. Thanks for the kudos.
ReplyDeleteI hope my project is on your "To Do" list for this summer! I can't wait to see what you can do to repurpose my kitchen cupboards from boring oak with good bones to distressed and painted fabulous Hope and Salvage vintage!!! I want to get my order in before you have to put me on a waiting list!
ReplyDeleteCheryl Hoover
I think a week in "West-by-God" would do me good!
ReplyDeleteFun transformation...very clever :)
ReplyDeleteNow that is just great! Love it!
ReplyDeleteHi LaVerne
ReplyDeleteYour TV turned bar is beautiful! Can't believe the transformation. I'm visiting from Catch as Catch Can, and I can see that I'm going to be a regular follower of yours. Hope you can come by for a visit!
Doreen
http://altered-artworks.blogspot.com
Doreen, Thanks for stopping by. Wait till you see what I'm working on now. The same thing you just finished. What a happy accident.
DeleteHoly Hanna! That is gorgeous. A true labor of love and it shows. You are right about the color. It is fantastic.
ReplyDelete